Monkey Paw wishes are among the most useful and dangerous mechanics in Phasmophobia.
The cursed possession can help you restore sanity, open a hiding spot, escape during a hunt, reveal information, manipulate ghost activity, and even revive a dead teammate.
The catch is that every useful wish comes with a drawback, and several wishes can trigger a cursed hunt or create a serious survival problem.
In the current version of Phasmophobia, there are 10 Monkey Paw wish types, although the number of wishes you can actually use depends on the contract’s difficulty multiplier.
This guide covers the Phasmophobia Monkey Paw wishes list, their effects and penalties, how many wishes you get, where the Monkey Paw appears, and how to use each wish more safely.
What Is the Monkey Paw in Phasmophobia?
The Monkey Paw is a Cursed Possession that allows players to make special wishes during an investigation.
Each wish provides a useful effect, but the game attaches a specific negative consequence to that benefit.
The possession was introduced with Phasmophobia update v0.8.1.0 and remains one of the riskiest tools available to investigators.
There are 10 wish types, but you cannot simply use all 10 in one contract because the available number depends on your difficulty reward multiplier.
That trade-off is what makes the Monkey Paw interesting the strongest wish is often the one that requires the most careful timing.
Monkey Paw Wishes Meaning
The idea behind the Monkey Paw is based on the classic be careful what you wish for concept.
In W. W. Jacobs’s 1902 horror story, a magical monkey’s paw grants wishes while bringing terrible unintended consequences.
Phasmophobia adapts that idea into a gameplay mechanic where every beneficial wish carries a penalty.
Instead of simply giving players what they ask for, the game makes the benefit useful while creating another problem to survive.
- The Monkey Paw is a cursed possession rather than an ordinary investigation item.
- Wishes are designed around risk and reward.
- Every useful wish has a corresponding drawback.
- Some penalties affect the player temporarily.
- Some penalties remain for the rest of the contract.
- Several wishes can directly trigger a cursed hunt.
- Some wishes change the ghost’s behavior.
- Some wishes affect player sanity.
- One wish can revive a dead teammate.
- One wish can provide useful ghost information.
- One wish can change the investigation weather.
- One wish can unlock exit doors during dangerous situations.
- Each individual wish can only be granted once during a contract.
- The number of available wishes depends on the difficulty multiplier.
- The best wish depends on the investigation rather than a single universal ranking.
How Many Monkey Paw Wishes Can You Make?
The number of Monkey Paw wishes in Phasmophobia is determined by the investigation’s reward multiplier.
Lower multipliers give you more opportunities to use the cursed possession, while higher multipliers reduce the number of available wishes.
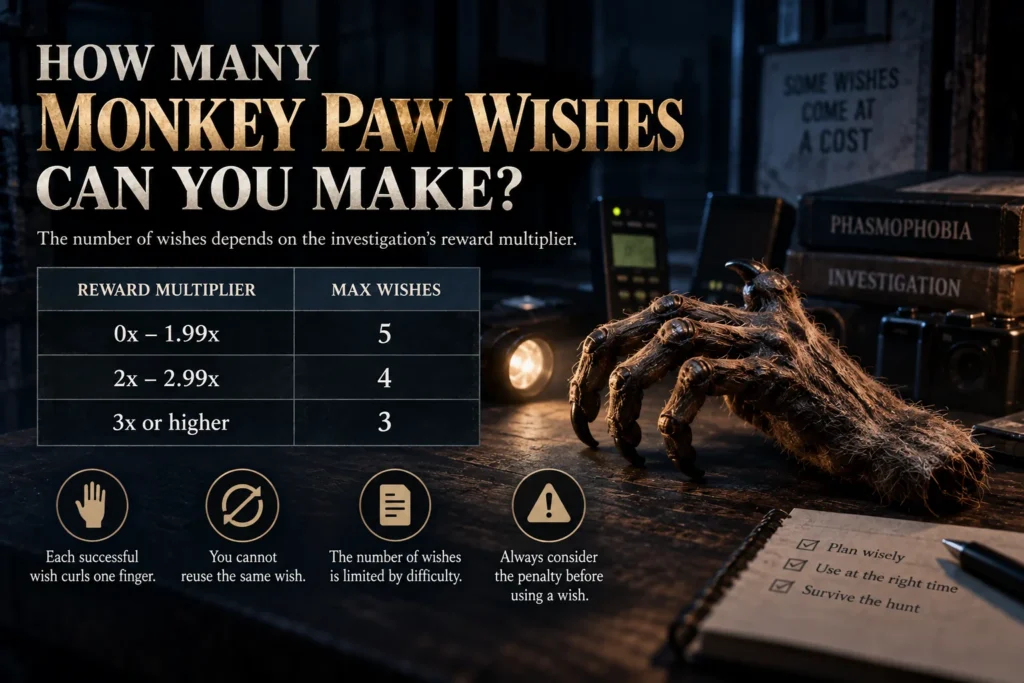
At 0x–1.99x, you can make five wishes; at 2x–2.99x, you get four; and at 3x or higher, you get three.
Each successful wish curls one of the Monkey Paw’s fingers, and once the available fingers are used, the possession cannot grant additional wishes during that contract.
Because you have a limited number of attempts, using a powerful wish simply because it is available can be a costly mistake.
Monkey Paw Wish Limits by Difficulty
The wish limit is important because a complete Monkey Paw wishes list contains more options than you can normally use in one investigation.
This means you need to choose which benefits matter most for the situation you are facing.
A low-multiplier investigation gives you more flexibility, while a high-multiplier investigation makes each wish more valuable.
Before using the Paw, check the difficulty and think about which future problem the wish could solve.
- 0x–1.99x You can use up to 5 wishes.
- 2x–2.99x You can use up to 4 wishes.
- 3x or higher You can use up to 3 wishes.
- One successful wish uses one finger.
- Used fingers remain curled for the contract.
- You cannot simply reuse the same wish.
- Having many wish options does not mean all can be used.
- Higher difficulty requires more careful planning.
- A dangerous wish can consume one of your limited opportunities.
- A defensive wish may be more valuable near the end of a hunt.
- A knowledge wish can be useful when the ghost pool has been narrowed.
- A weather wish is usually more situational.
- A revive wish matters primarily when a teammate is dead.
- An escape wish can be valuable during a dangerous hunt.
- Always consider the penalty before spending a limited wish.
All Monkey Paw Wishes in Phasmophobia
There are 10 main Monkey Paw wish types covering ghost manipulation, player protection, sanity, information, revival, weather, and a random-wish option.
The wishes include I wish for Sanity, I wish to be safe, I wish to leave, I wish to see the ghost, I wish for activity, I wish to trap the ghost, I wish for life, I wish for knowledge, I wish for weather, and I wish for anything.
Every wish can only be used once, so selecting one should be based on the investigation rather than curiosity alone.
Some wishes are excellent for evidence gathering, while others are better reserved for emergencies or multiplayer situations.
Understanding the effect and penalty of every option before touching the Paw can prevent an avoidable death.
All Phasmophobia Monkey Paw Wishes List
The following list gives you a quick reference for the major wishes available through the Monkey Paw.
These are the core wishes behind most searches for all monkey paw wishes phasmophobia and Phasmophobia Monkey Paw wishes list.
Exact recognized wording can vary because the game supports voice recognition and a text-based wish interface.
If voice recognition causes trouble, the text-based interface provides a more reliable way to select the intended option.
- I wish for sanity sets player sanity to 50% with a lasting sanity-drain penalty.
- I wish to be safe opens the nearest blocked hiding spot but makes the ghost more capable of detecting the wisher.
- I wish to leave unlocks exit doors, including during a hunt, but temporarily reduces movement and vision.
- I wish to see the ghost forces a ghost event followed by a cursed hunt.
- I wish for activity doubles ghost activity for two minutes but breaks the fuse box and locks exits temporarily.
- I wish to trap the ghost confines the ghost to its favorite room temporarily and creates a later hunt.
- I wish for life revives a dead teammate but gives the wisher a 50% chance of dying.
- I wish for knowledge removes incorrect evidence information but triggers a dangerous hunt and sensory penalties.
- I wish for weather changes the weather while reducing sanity and temporarily impairing vision.
- I wish for anything randomly grants one remaining wish and its associated penalty.
- Each wish is consumed after successful activation.
- The Paw cannot grant every wish in one contract.
- The number of available uses depends on difficulty.
- Wish penalties should be considered before activation.
- Some wishes are much more dangerous during an active investigation than others.
Monkey Paw Wishes and Effects
The most important part of using the Paw is understanding that the positive effect is never the whole story.
A wish that appears helpful in isolation can become dangerous when combined with its penalty.
For example, increasing ghost activity can help produce interactions, but permanently breaking the fuse box changes the rest of the investigation.
Similarly, reviving a teammate can save the run while simultaneously putting the person making the wish at significant risk.
The safest way to use the Paw is to match the wish to a specific problem rather than wishing simply because you can.
Monkey Paw Wishes and Effects
Each wish has a specific gameplay purpose and a corresponding drawback that changes how the rest of the contract may unfold.
The current mechanics documented in 2026 guides confirm the same broad 10-wish structure and associated penalties.
Some effects are temporary, while others can remain for the remainder of the investigation.
The following quick-reference points summarize what each wish actually does.
- Sanity Sets every player’s sanity to 50%.
- Sanity penalty Passive sanity loss becomes faster and the ghost’s favorite room can change.
- Safe Opens the nearest blocked hiding spot.
- Safe penalty The current room’s lights break and the ghost gains stronger detection of the wisher.
- Leave Unlocks exit doors even when escaping a hunt.
- Leave penalty Movement and vision are temporarily impaired.
- See ghost Forces a ghost event.
- See ghost penalty A cursed hunt follows after the event and vision becomes obscured.
- Activity Doubles ghost activity for two minutes.
- Activity penalty The fuse box breaks permanently and exits remain locked temporarily.
- Trap ghost Restricts the ghost to its favorite room for about one minute.
- Trap penalty Your room is locked and a hunt follows the trapping period.
- Life Revives a dead teammate in multiplayer.
- Life penalty The wisher has a 50% chance of dying.
- Knowledge Removes an incorrect evidence possibility but triggers severe sensory and hunt penalties.
I Wish for Sanity
The sanity wish is one of the most misunderstood Monkey Paw options because it does not simply give everyone maximum sanity.
Instead, it sets the players’ sanity to 50%, which can be useful if everyone is already dangerously low but wasteful if your team is currently above that level.
Afterward, passive sanity drain is increased, and the ghost’s favorite room can change, making the benefit come with a longer-term cost.
For that reason, this wish is usually more useful as a controlled reset than as a casual early-game choice.
Think about your current sanity, remaining objectives, and whether changing the ghost’s favorite room could complicate the investigation.
Best Uses for the Sanity Wish
The sanity wish works best when you have a clear reason for wanting everyone around the same 50% level.
It can be useful when your team is already struggling with sanity and needs a reset before continuing the investigation.
However, using it while everyone is comfortably above 50% can throw away the value of the wish.
Always remember that the increased sanity drain means the benefit is temporary in practical terms.
- Use it when team sanity is already dangerously low.
- Avoid wasting it when everyone is comfortably above 50%.
- Consider the remaining investigation time first.
- Remember that sanity will drain faster afterward.
- Expect the ghost’s favorite room to potentially change.
- Recheck the investigation area after the wish.
- Avoid using it simply because the option is available.
- Coordinate with teammates before activating it.
- Consider whether a hunt is likely to happen soon.
- Keep escape routes available after using it.
- Use it when the 50% reset solves an actual problem.
- Do not confuse it with a full sanity restoration.
- Consider your difficulty multiplier before spending it.
- Remember that one wish cannot be reused.
- Treat it as a strategic reset rather than a free bonus.
I Wish to Be Safe
The safe wish opens the nearest blocked hiding spot, which can be extremely valuable when available hiding places are limited.
The trade-off is severe the lights in the current room break, and the ghost can detect the wisher and their active electronics at any distance.
That makes the wish useful for creating an emergency hiding option but potentially dangerous if the player continues using electronics carelessly.
It is particularly important to understand that opening a hiding spot does not make the player permanently safe.
The wish solves one problem while creating a new detection risk that must be managed.
Best Uses for the Safe Wish
The safe wish is most valuable when a blocked hiding location is the difference between having an escape route and having none.
Before using it, identify where you could hide and understand how the ghost might detect you afterward.
Once the wish has been made, unnecessary electronics become a liability for the player who activated it.
Use the newly opened hiding location as part of a complete escape plan rather than assuming the wish itself prevents death.
- Use it when the nearest hiding spot is blocked.
- Check your surroundings before making the wish.
- Know where the opened hiding spot is located.
- Avoid unnecessary electronics afterward.
- Turn off equipment when it is no longer needed.
- Do not assume the wish makes you invisible.
- Remember that the ghost can detect the wisher from far away.
- Consider the room’s lighting situation.
- Plan an escape route before activating it.
- Tell teammates what you are doing.
- Avoid activating it casually during a safe investigation.
- Use it when survival value outweighs the detection penalty.
- Keep your movement route clear.
- Remember that hiding still requires good timing.
- Treat the wish as an emergency utility rather than immunity.
I Wish to Leave
The leave wish is one of the most powerful emergency options because it can unlock the exit doors even when a hunt is active.
Its cost is a temporary movement-speed reduction accompanied by reduced vision while the effect takes place.
That makes it particularly useful when escaping a dangerous situation where reaching the exit is more valuable than maintaining normal movement speed.
Using it at the wrong time can still leave you vulnerable because the temporary impairment affects your ability to move and see clearly.
It is best treated as an emergency escape tool rather than a routine convenience.
Best Uses for the Leave Wish
The leave wish makes the most sense when getting out of the investigation is immediately more important than continuing the contract.
It can provide an alternative to hiding when a hunt is already underway and normal escape routes are unavailable.
However, the temporary movement penalty means you should understand the route before making the wish.
If you are already in a safe position, spending this wish may provide little practical benefit.
- Save it for genuine escape situations.
- Know the location of the exit before using it.
- Consider the current ghost position.
- Remember that your movement speed is temporarily reduced.
- Expect reduced vision during the effect.
- Do not panic after the doors unlock.
- Use the wish when escape is more valuable than evidence.
- Tell teammates before activating it when possible.
- Avoid wasting it simply to leave early.
- Consider whether another player can safely escape first.
- Keep your route toward the exit clear.
- Remember that the wish consumes one available use.
- Be prepared for temporary visual impairment.
- Avoid unnecessary detours after activation.
- Treat it as an emergency escape button.
I Wish to See the Ghost
The see-the-ghost wish forces a ghost event and then leads into a cursed hunt, making it one of the riskiest wishes for players who are not prepared.
The ghost appears in connection with the forced event, exit doors become locked, and a cursed hunt follows after a short interval.
The player’s vision is also obscured during the dangerous portion of the sequence.
This wish can be useful for players who deliberately want to force a ghost interaction or test behavior, but it should never be treated as a harmless photo opportunity.
Have a survival plan ready before speaking the wish.
Best Uses for the See Ghost Wish
The main reason to use this wish is to deliberately force a ghost interaction when your team has a clear objective for doing so.
It can help create a dramatic ghost event or provide a controlled opportunity to observe the ghost.
However, the forced cursed hunt means you need to know where you will hide before making the request.
If your team is already struggling with survival, this is usually a poor wish to spend casually.
- Know your hiding location first.
- Avoid using it without a survival plan.
- Expect the exit doors to lock.
- Prepare for the following cursed hunt.
- Keep teammates informed before activating it.
- Avoid standing in exposed areas.
- Consider the ghost’s current location.
- Use it when a forced event has a purpose.
- Be ready for reduced visibility.
- Do not treat the event as harmless.
- Keep your escape route in mind.
- Avoid combining it with unnecessary risks.
- Remember that the wish cannot be reused.
- Consider using it only when the team is prepared.
- Prioritize survival once the hunt begins.
I Wish for Activity
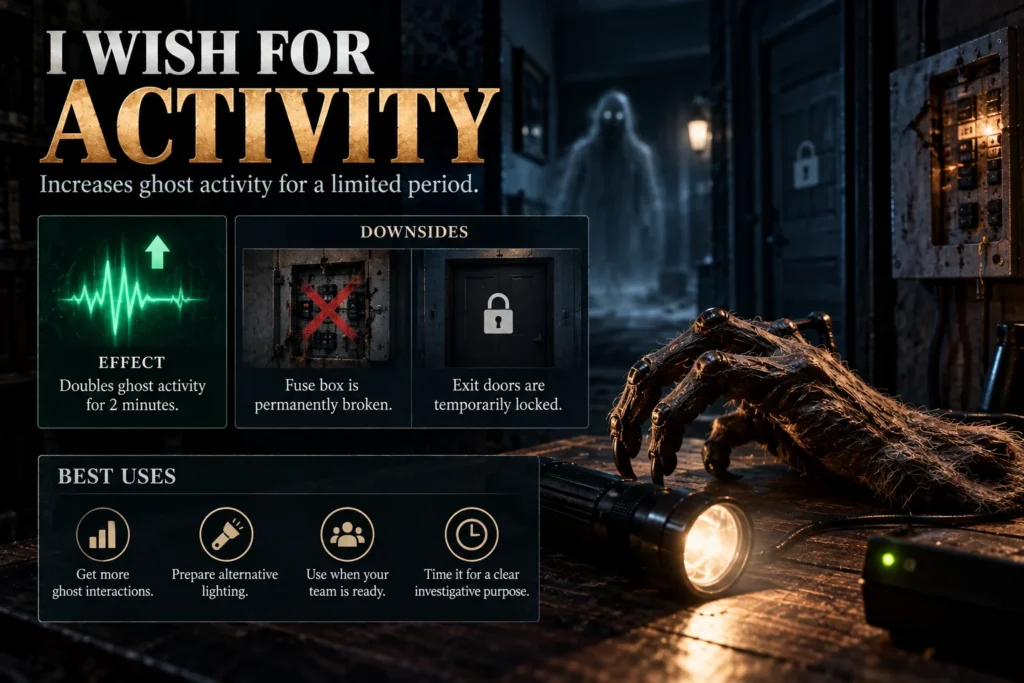
The activity wish increases ghost activity for a limited period, making it useful when your team wants more interactions or movement.
Current guides describe the effect as doubled ghost activity for two minutes, while the downside includes a permanently broken fuse box and temporarily locked exit doors.
That means the wish can accelerate an investigation but also removes a major source of lighting for the remainder of the contract.
It can be useful when the team is already equipped to handle the loss of the fuse box.
The best timing is usually when increased activity has a clear investigative purpose.
Best Uses for the Activity Wish
Use the activity wish when additional interactions could meaningfully help your investigation.
Before activating it, make sure your team has flashlights or other ways to navigate because the fuse box penalty is permanent for the contract.
You should also understand that locked exits create additional danger if a hunt occurs during the effect period.
The wish is therefore strongest when your team is organized and prepared for both the benefit and the penalty.
- Use it when you need more ghost interactions.
- Prepare alternative lighting before activating it.
- Remember that the fuse box can break permanently.
- Expect exits to remain locked temporarily.
- Tell the team before making the wish.
- Avoid using it when your team depends heavily on the breaker.
- Keep track of the two-minute activity window.
- Watch for useful ghost interactions.
- Do not assume increased activity means guaranteed evidence.
- Prepare for a possible hunt.
- Keep flashlights available.
- Use the extra activity strategically.
- Avoid wasting the wish early without a purpose.
- Consider your remaining objectives.
- Make sure everyone understands the consequences.
I Wish to Trap the Ghost
The trap ghost wish moves the ghost to its favorite room and prevents it from hunting, roaming, or using abilities for roughly one minute.
At the same time, the doors of the wisher’s current room are locked for that period, and a hunt follows once the trapping period ends.
This makes it a powerful investigation tool because your team gets a temporary window in which the ghost cannot behave normally.
The danger comes immediately afterward, so the team should use the quiet period efficiently rather than relaxing completely.
Knowing where the ghost’s favorite room is and where your own team is positioned can make this wish much safer.
Best Uses for the Trap Ghost Wish
This wish can be particularly valuable when you need a short period to investigate without the ghost roaming or using abilities.
It can also help organize a team before the next phase of the investigation begins.
However, the forced hunt after the trapping period means you should prepare your hiding plan before using the wish.
Use the quiet minute to accomplish something specific rather than simply waiting for the effect to end.
- Use it when you need a controlled investigation window.
- Know the ghost’s favorite room when possible.
- Prepare for the hunt that follows.
- Avoid using it without a hiding plan.
- Keep your team together when appropriate.
- Use the quiet period efficiently.
- Gather equipment before making the wish.
- Collect evidence while the ghost is restricted.
- Avoid unnecessary delays.
- Remember that the wisher’s room can become locked.
- Keep communication clear with teammates.
- Prepare for the doors to unlock afterward.
- Expect the ghost to become dangerous again.
- Consider using it when activity is difficult to observe.
- Treat the one-minute period as a limited resource.
I Wish for Life
The life wish is one of the most dramatic Monkey Paw options because it can revive a dead teammate.
Its major drawback is a 50% chance that the player making the wish dies, making the exchange extremely risky.
It is a multiplayer-focused option and has little or no value when there is no teammate available to revive.
The decision should depend on the importance of the dead player, the state of the investigation, and whether the team can accept losing the wisher.
Never use this wish without understanding that the revival is not free.
Best Uses for the Life Wish
The life wish is best viewed as a calculated multiplayer gamble rather than a normal healing mechanic.
It can be worthwhile when a dead teammate is carrying important equipment or when keeping the team alive is strategically valuable.
However, a 50% death chance means the wish can quickly turn one dead teammate into another casualty.
Discuss the risk with your team before activating it whenever circumstances allow.
- Use it only when a teammate is actually dead.
- Remember the 50% death risk.
- Consider what equipment the dead teammate carries.
- Discuss the decision with surviving teammates.
- Avoid using it for curiosity.
- Consider the remaining objectives.
- Think about whether the revived player can immediately contribute.
- Keep escape options ready.
- Do not assume the wisher will survive.
- Remember that the wish is consumed after use.
- Consider whether another wish has greater value.
- Use it when the potential benefit justifies the risk.
- Be prepared for the investigation to continue without the wisher.
- Do not treat the revive as guaranteed safety.
- Make the decision based on the actual state of the contract.
I Wish for Knowledge
The knowledge wish is designed to help narrow down the ghost by removing incorrect information from the journal.
The benefit is powerful for investigations, but the penalty is severe it triggers a dangerous hunt and impairs vision and hearing for the remainder of the contract or under the game’s relevant conditions.
Because sensory information is crucial in Phasmophobia, losing clear sight and sound can make the remainder of the investigation considerably harder.
This wish therefore becomes more attractive when you have already collected substantial evidence and need help narrowing the remaining possibilities.
Using it too early can remove some of the very information you need to survive and investigate.
Best Uses for the Knowledge Wish
The knowledge wish is strongest when you are already close to identifying the ghost and can tolerate the sensory penalty.
It is particularly useful as a late-investigation tool rather than an early-game shortcut.
Before activating it, make sure your team has recorded as much normal evidence as possible.
If you still need to rely heavily on visual and audio clues, the penalty may outweigh the benefit.
- Use it when the remaining ghost pool is small.
- Gather normal evidence before activating it.
- Understand that a hunt follows.
- Prepare a hiding spot first.
- Expect impaired vision.
- Expect impaired hearing.
- Consider using it later in the investigation.
- Avoid using it simply because you are curious.
- Record important evidence before making the wish.
- Tell teammates about the upcoming penalty.
- Do not rely on normal sensory cues afterward.
- Consider whether the remaining evidence is already sufficient.
- Use the wish when narrowing the ghost matters.
- Remember that the penalty can last for the contract.
- Treat it as a high-risk information shortcut.
Monkey Paw Weather Wishes
Weather wishes allow players to change the investigation’s weather to one of the available weather options.
Current guides list options including clear sky, fog, rain, snow, and sunrise, with rain having light/heavy variations.
The benefit is mainly environmental or aesthetic rather than a direct ghost-identification shortcut.
The drawback is a 25% sanity reduction and temporary visual impairment, and current documentation notes a minimum sanity requirement for using the weather wish.
Because only one weather change can be made through the Paw, choose it for a specific reason rather than repeatedly experimenting.
Monkey Paw Weather Wishes and Effects
Weather wishes are among the easiest options to understand because the desired environmental change is immediately visible.
However, the sanity and vision penalties mean that even an apparently harmless weather change has a gameplay cost.
Weather can include several options depending on the current game version and interface.
If you are already low on sanity, think carefully before using this option.
- Clear Sky changes the investigation weather.
- Fog changes the environmental weather.
- Rain changes the weather and may vary in intensity.
- Snow changes the weather where available.
- Sunrise changes the weather/time-of-day appearance.
- Weather changes cost sanity.
- The weather wish reduces sanity by 25%.
- Players experience temporary visual impairment.
- The wish has a minimum sanity requirement.
- Weather is mainly situational rather than investigative.
- Use it when the weather change has a specific purpose.
- Avoid wasting the wish when sanity is already low.
- Remember that the weather option counts as one wish.
- Consider the remaining investigation time.
- Do not confuse a weather change with a ghost-effect wish.
I Wish for Anything
The anything wish is the wildcard option among the Monkey Paw wishes.
Instead of choosing a specific effect, it grants a random remaining wish and applies the corresponding penalty.
That makes it one of the least predictable choices because you give up control over which remaining wish will activate.
It can be entertaining when the team accepts the risk, but it is usually a poor choice when survival or a specific objective matters.
If you need one particular effect, select that wish directly instead of relying on randomness.
Best Uses for the Anything Wish
The anything wish is best understood as a gamble rather than a strategic shortcut.
It can be fun in casual investigations where the team intentionally wants an unpredictable outcome.
In serious high-multiplier runs, however, giving up control can be particularly costly because you have fewer wishes available.
If you are trying to solve a specific problem, choose the relevant wish instead.
- Use it when you genuinely accept randomness.
- Avoid it during high-stakes investigations.
- Remember that the result is random.
- You inherit the selected wish’s penalty.
- Do not expect a specific desired effect.
- Consider the remaining unused wishes.
- Think about your difficulty multiplier.
- Avoid using it when only one safe option remains.
- Use it for entertainment in casual games if desired.
- Tell teammates before taking the gamble.
- Be prepared for a hunt.
- Be prepared for sensory penalties.
- Be prepared for sanity loss.
- Be prepared for environmental changes.
- Remember that randomness removes your control over the outcome.
Monkey Paw Wishes Locations
The Monkey Paw has fixed spawn locations when it is selected as the cursed possession for a contract.
Current 2026 guides document locations across small houses, farms, medium maps, large maps, Point Hope, and Nell’s Diner.
However, the Monkey Paw is only one of several possible cursed possessions, so its fixed location does not mean it will appear in every investigation.
When it does appear, knowing the location can save valuable time at the beginning of a contract.
The exact map layout or recent rework can affect where you should look, so current map information matters.
Monkey Paw Wishes Locations on Every Map
The locations below reflect current 2026 guide information, including newer locations such as Point Hope and Nell’s Diner and the March 2026 Tanglewood rework.
If you do not find the Paw in the listed spot, remember that another cursed possession may have spawned instead.
The Paw’s location is different from the locations of the individual wish tags in Sunny Meadows.
Learning the distinction between the item’s spawn point and the wish-tag locations makes searching much easier.
- 6 Tanglewood Drive Garage, on a bag of soil beside gardening supplies.
- 42 Edgefield Road Upstairs in the orange kids’ room, on the baby changing table.
- 10 Ridgeview Court Upstairs in the blue/teal bedroom, on a desk.
- Nell’s Diner Kitchen, on a cutting board beside a large knife.
- Grafton Farmhouse First-floor double bedroom, on a desk in the corner.
- Bleasdale Farmhouse Second-floor bedroom, on a chest beside the crib.
- 13 Willow Street Dining room, inside the glass display cabinet.
- Brownstone High School Commonly in the main lobby area on a cardboard box.
- Point Hope Current 2026 guides document a Monkey Paw spawn on the eighth-floor desk with the wooden horse.
- Maple Lodge Campsite At the end of the pier on a camping chair.
- Camp Woodwind Near the small purple-and-blue tent on a wooden surface.
- Prison At the entrance, on the far-right side of the table.
- Sunny Meadows Down the main hallway from the entrance, in the candle-filled room.
- The Monkey Paw is not guaranteed to spawn on every contract.
- Custom modes or special challenges can alter normal cursed-possession behavior.
Monkey Paw Wish Tags in Sunny Meadows
You do not have to collect the wish tags before using the Monkey Paw.
However, the tags provide a convenient way to learn the available wishes and record many of them in the journal for later reference.
Most of the standard wish tags are distributed through different rooms in Sunny Meadows.
Weather and anything are treated differently and do not need to be learned through the same tag system.
This makes Sunny Meadows useful as a practice and reference location when you want to learn the Monkey Paw without relying on an external list.
Phasmophobia Monkey Paw Wish Tag Locations
The wish tags are separate from the Monkey Paw’s normal spawn location.
Each tag corresponds to a specific wish and can help you build a reference in your journal.
The following locations are useful if you want to learn the wishes naturally inside the game.
You do not need to collect them all to use the Paw effectively.
- See the ghost Manager’s Office.
- Activity Chapel.
- Trap the ghost Female Dorm Room.
- Sanity Kitchen.
- Safe Matron Office 1.
- Leave Hospital Wing.
- Life Classroom.
- Knowledge Restricted Area.
- Weather Morgue.
- Anything Waiting Room.
- Tags are found throughout Sunny Meadows.
- Collecting a tag records the associated wish for reference.
- The tags resemble the Monkey Paw’s own wish label.
- Weather options are handled differently from ordinary wish tags.
- Finding the tags is optional because the wishes can still be used without them.
Best Monkey Paw Wishes
There is no single universally best Monkey Paw wish because the correct choice depends on your team, difficulty, sanity, evidence, ghost behavior, and current danger.
A wish that is excellent in one investigation can be a terrible choice in another.
For example, the trap wish can create a useful evidence window, while the life wish can save a teammate at the cost of a potentially fatal gamble.
The leave wish is particularly valuable when escaping is more important than completing the investigation.
The best approach is to rank wishes by the problem they solve rather than by their raw power.
Best Wishes for Different Situations
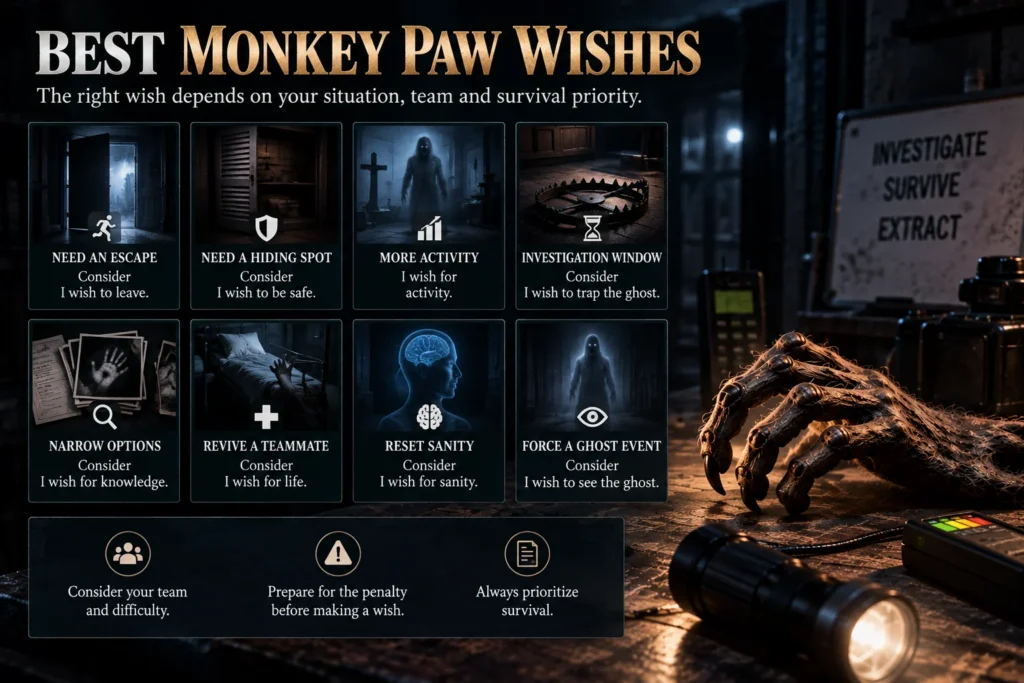
A situational ranking is more useful than simply calling one wish the strongest.
Your priority should always be survival first, followed by the objective you are trying to accomplish.
The following examples show when different wishes may provide the greatest practical value.
Remember that every option still carries its documented penalty.
- Need an escape Consider I wish to leave.
- Need a hiding spot Consider I wish to be safe.
- Need more ghost interactions. I wish for activity.
- Need a temporary investigation window Consider I wish to trap the ghost.
- Need to narrow ghost possibilities Consider I wish for knowledge.
- Need to revive a teammate Consider I wish for life.
- Need a sanity reset Consider I wish for sanity.
- Need a forced ghost event Consider I wish to see the ghost.
- Need a weather change Consider the weather wish.
- Want randomness Consider I wish for anything.
- Save dangerous wishes for moments when their benefit matters.
- Prepare for the penalty before making the request.
- Consider your difficulty multiplier.
- Communicate with teammates before high-risk wishes.
- Never choose a wish without considering how you will survive its consequence.
Monkey Paw Wishes Tips and Tricks
The most important Monkey Paw strategy is preparation.
Because several wishes can trigger hunts or impair your senses, making the wish before planning your escape can turn a useful effect into a fatal mistake.
Keep track of the wishes already used, the remaining number of fingers, and the consequences attached to the options you are considering.
Voice recognition can also be imperfect, so the text-based wish interface can be useful when you need precise control.
Treat the Paw as a strategic tool rather than a collection of free bonuses.
How to Use Monkey Paw Wishes Safely
Before making a wish, identify the problem you are trying to solve and the penalty you are accepting.
If a wish can trigger a hunt, prepare your hiding position first instead of making the wish and searching afterward.
For voice recognition, speak the intended wish clearly or use the text-based interface when available.
Good Monkey Paw usage is less about using the maximum number of wishes and more about using the right wish at the right moment.
- Read the penalty before making a high-risk wish.
- Prepare hiding spots before hunt-triggering wishes.
- Communicate with your team.
- Track how many wishes remain.
- Do not repeat a wish that has already been used.
- Use the text interface if voice recognition is unreliable.
- Speak clearly when using voice recognition.
- Avoid casual wishes early in difficult contracts.
- Keep necessary equipment ready.
- Consider sanity before choosing a weather wish.
- Consider lighting before choosing the activity wish.
- Consider the ghost room before choosing the trap wish.
- Consider the dead player before choosing the life wish.
- Consider your remaining evidence before choosing the knowledge wish.
- Always have a survival plan before activating a dangerous wish.
Monkey Paw Photo Reward and Journal Tips
The Monkey Paw is not only a wishing tool; it can also be useful as a photo objective during an investigation.
Current 2026 guides report that photographing the Monkey Paw can provide a photo reward depending on the camera tier.
The wish tags can also help players learn the system without memorizing every phrase from the beginning.
This makes the Paw worth understanding even when you do not plan to spend many of its wishes.
A player who learns the mechanics can make better decisions when the cursed possession appears unexpectedly.
Monkey Paw Learning and Photo Tips
Learning the wish system before a difficult contract can reduce mistakes when you finally encounter the Paw.
The journal tags provide an in-game reference, while a photo can provide additional contract value.
You do not have to use a dangerous wish just to interact with the possession.
If your objective is simply to document the item, focus on the photo rather than spending a valuable wish unnecessarily.
- Photograph the Monkey Paw when a photo objective is useful.
- Learn the wish tags in Sunny Meadows if you want an in-game reference.
- Do not confuse wish tags with the Paw’s actual spawn location.
- Remember that the Paw may not appear in every contract.
- Check the item before spending a wish.
- Learn dangerous penalties before using the possession.
- Use the journal as a reference when available.
- Keep track of your remaining fingers.
- Do not assume all 10 wishes are available in one contract.
- Remember that difficulty affects the number of uses.
- Use the photo opportunity even if you do not need a wish.
- Consider camera tier when thinking about the photo reward.
- Avoid wasting wishes just to test them.
- Learn the difference between weather and standard wishes.
- Practice the system before relying on it in high-difficulty runs.
Jump into Other Related Article
- 50+ Gedicht Huwelijk Felicitatie | De Mooiste Gedichten voor het Bruidspaar
- Monday Morning Wishes | Good Morning, Happy, Blessed & Positive Monday Messages
- Happy 15th Birthday Wishes | Sweet, Funny, Heartfelt & Inspirational Messages
Monkey Paw Wishes vs. Other Cursed Possessions
The Monkey Paw is one of several Cursed Possessions in Phasmophobia, but its mechanics are different from objects such as Tarot Cards, the Ouija Board, or the Summoning Circle.
Its defining feature is that the player actively selects a desired effect rather than simply interacting with a random card or another fixed mechanic.
That control is powerful, but the consequences are also deliberately attached to the chosen benefit.
The result is a possession that rewards planning more heavily than spontaneous use.
Understanding that distinction helps explain why experienced players often save Monkey Paw wishes for specific situations.
Why the Monkey Paw Is Risky
The Paw is risky because the player knowingly chooses an effect that can alter the investigation while also accepting its consequence.
Several wishes can initiate cursed hunts, while others permanently change important investigation conditions.
This makes preparation especially important when playing at higher difficulty multipliers.
A good player does not simply ask what a wish gives; they also ask what the wish will cost.
- The Paw gives deliberate choices.
- Each choice has a corresponding penalty.
- Some penalties trigger hunts.
- Some penalties affect sanity.
- Some penalties affect vision.
- Some penalties affect hearing.
- Some penalties affect movement.
- Some penalties affect lighting.
- Some penalties affect ghost behavior.
- One wish can revive a teammate.
- One wish can change weather.
- One wish can unlock exits.
- One wish can reveal useful information.
- Higher difficulty means fewer wishes.
- Planning is therefore central to effective Monkey Paw use.
Conclusion
Monkey Paw wishes are powerful because they give Phasmophobia players a way to deliberately manipulate an investigation, but every advantage comes with a cost.
The complete system includes 10 main wish types covering sanity, safety, escape, ghost activity, ghost trapping, revival, knowledge, weather, ghost events, and random outcomes.
The most important skill is not memorizing the names alone; it is understanding when the benefit is worth accepting the penalty.
Whether you are looking for all Monkey Paw wishes Phasmophobia, wish locations, effects, examples, or the best wishes for a particular situation, preparation will always make the possession safer to use.
Choose carefully, plan your escape before dangerous wishes, and remember the central rule of the Monkey Paw the wish may help you, but it will never help for free.
What are all the Monkey Paw wishes?
The 10 main wishes are Sanity, Safe, Leave, See the Ghost, Activity, Trap the Ghost, Life, Knowledge, Weather, and Anything.
How many Monkey Paw wishes can I use?
You can use 5 wishes at 0x–1.99x, 4 wishes at 2x–2.99x, and 3 wishes at 3x or higher, based on the difficulty reward multiplier.
What is the strongest Monkey Paw wish?
There is no universal best wish. Trap, leave, knowledge, life, and activity can each be powerful in different situations, but all have meaningful drawbacks.
Can the Monkey Paw revive teammates?
Yes. I wish for life can revive a dead teammate, but the player making the wish has a 50% chance of dying.
Where is the Monkey Paw located?
Its location depends on the map, but current guides list fixed locations for maps including Tanglewood, Edgefield, Ridgeview, Nell’s Diner, Point Hope, Maple Lodge Campsite, Prison, and Sunny Meadows.
What is the safest way to use Monkey Paw wishes?
Know the penalty before making the wish, prepare a hiding or escape plan for hunt-triggering wishes, and use the text-based interface if voice recognition is unreliable.